

Modifier groups help keep your modifiers organized and are customizable to best suit your needs.
To add a modifier group, under the Control Panel in CCP click Online Ordering, then click Modifier Groups Library.
You may have a list of modifiers already added by your onboarding team when you were first set up with Online Ordering. To add a new modifier group, simply click the Add Modifier Group button at the top.

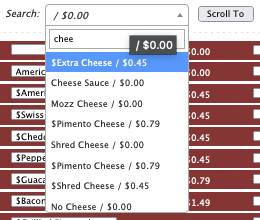
If you have a POS integrated with Appsuite, then you will see a list of modifiers that you can add to the modifier group taken from your POS. Each modifier will have the POS ID # and the price of the modifier.

To find a specific modifier, type the name of the modifier in the search box and click Scroll To to scroll to that modifier. Once you have modifier you need, simply drag it over to the Selected Modifiers column. Once you’ve added all of the modifiers to that group, click Save to save the group, and you will be brought back to the list of modifier groups.
There are various settings you can choose from to customize how customers can add a modifier to a menu item.
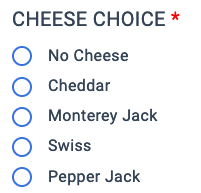
One – Selecting one will allow a customer to select one of the modifiers in the modifier group. On our new App 2.0, each modifier will appear with a Radio Button, so only one may be chosen.

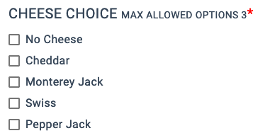
Multi – Selecting Multi will bring up a Multi Max dropdown. This allows a customer to select multiple modifiers. The numbers on the Multi Max dropdown lets a customer know the maximum number of modifiers they can choose. If you select an amount lower than the total number of modifiers, customers will see a note of the max number of options they can choose.

Qty – When checked, this option allows customers to choose an amount for each modifier. Customers will see a number next to the modifier and can increase or decrease the amount of that modifier.

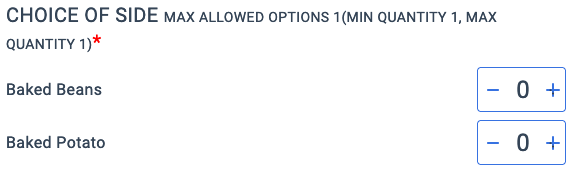
Required – When checked, this option makes that modifier group a required choice for that menu item. A red asterisk will show up in the app and a customer will not be able to add a menu item to their cart without first choosing that modifier.

Note: When you first create a modifier group, we recommend making all necessary changes before connecting them to menu items. If you need to make changes to the modifier group settings to connected menu items, you will have to do so in the Menu Manager.
Next, you can click Connect to start connecting menu items to that modifier group. Simply click and drag the menu items you want to connect to the Linked Menu Items column.
Once finished, click the Save button in the upper right corner.

Comments